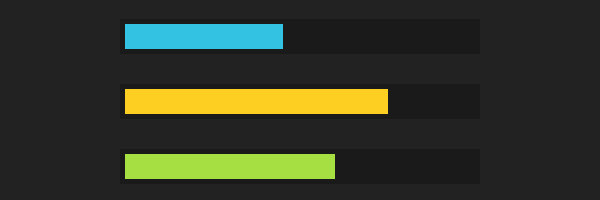
尽管HTML5已经有了progress标签用来实现一个进度条,但对于许多美化追求者来说,这样的进度条可能可定制性还是比不上自己用HTML模拟出来的;另外,截至目前,Android内置浏览器、Safari浏览器都还没有支持progress标签,这也给开发者带来了麻烦。
本文,我们来看看如何使用HTML+CSS3打造一个漂亮的进度条。
本文全部代码均来自http://www.red-team-design.com/stylish-css3-progress-bars,如果您对其中的任何技术细节存在疑问,请以原文为准。
HTML
非常好,HTML还是这么的简洁明了。其中的width属性我们直接内嵌在其中了,这个属性是用来表示进度条的进度的,大家可以根据自己的需求进行修改。在实际使用过程中,这个进度值通常是由JavaScript脚本来动态修改的。
CSS
.progress-bar {
        background-color: #1a1a1a;
        height: 25px;
        padding: 5px;
        width: 350px;
        margin: 50px 0;
        -moz-border-radius: 5px;
        -webkit-border-radius: 5px;
        border-radius: 5px;
        -moz-box-shadow: 0 1px 5px #000 inset, 0 1px 0 #444;
        -webkit-box-shadow: 0 1px 5px #000 inset, 0 1px 0 #444;
        box-shadow: 0 1px 5px #000 inset, 0 1px 0 #444;
}

.progress-bar span {
        display: inline-block;
        height: 25px;
        width: 200px;
        -moz-border-radius: 3px;
        -webkit-border-radius: 3px;
        border-radius: 3px;
        -moz-box-shadow: 0 1px 0 rgba(255, 255, 255, .5) inset;
        -webkit-box-shadow: 0 1px 0 rgba(255, 255, 255, .5) inset;
        box-shadow: 0 1px 0 rgba(255, 255, 255, .5) inset;
}
现在我们有了基本的CSS代码,其中用到了一些用户浏览器可能不支持的特性,这一点应当注意,类似圆角之类的特性我们暂时还没有办法让太老的浏览器(尤其是IE6)来支持。
现在,我们可以增加颜色相关的代码了。
.blue span {
        background-color: #34c2e3;
}

.orange span {
          background-color: #fecf23;
          background-image: -webkit-gradient(linear, left top, left bottom, from(#fecf23), to(#fd9215));
          background-image: -webkit-linear-gradient(top, #fecf23, #fd9215);
          background-image: -moz-linear-gradient(top, #fecf23, #fd9215);
          background-image: -ms-linear-gradient(top, #fecf23, #fd9215);
          background-image: -o-linear-gradient(top, #fecf23, #fd9215);
          background-image: linear-gradient(top, #fecf23, #fd9215);
}

.green span {
          background-color: #a5df41;
          background-image: -webkit-gradient(linear, left top, left bottom, from(#a5df41), to(#4ca916));
          background-image: -webkit-linear-gradient(top, #a5df41, #4ca916);
          background-image: -moz-linear-gradient(top, #a5df41, #4ca916);
          background-image: -ms-linear-gradient(top, #a5df41, #4ca916);
          background-image: -o-linear-gradient(top, #a5df41, #4ca916);
          background-image: linear-gradient(top, #a5df41, #4ca916);
}
这里我们主要用了linear-gradient,这个特性是CSS3当中新加入的,截至目前,IE9还不支持它。
条纹效果
但是现在我们的滚动条还不是动态的。非常幸运的是,CSS3也已经开始支持一些动态特性了。
.stripes span {
        -webkit-background-size: 30px 30px;
        -moz-background-size: 30px 30px;
        background-size: 30px 30px;
        background-image: -webkit-gradient(linear, left top, right bottom,
                                                color-stop(.25, rgba(255, 255, 255, .15)), color-stop(.25, transparent),
                                                color-stop(.5, transparent), color-stop(.5, rgba(255, 255, 255, .15)),
                                                color-stop(.75, rgba(255, 255, 255, .15)), color-stop(.75, transparent),
                                                to(transparent));
        background-image: -webkit-linear-gradient(135deg, rgba(255, 255, 255, .15) 25%, transparent 25%,
                                                transparent 50%, rgba(255, 255, 255, .15) 50%, rgba(255, 255, 255, .15) 75%,
                                                transparent 75%, transparent);
        background-image: -moz-linear-gradient(135deg, rgba(255, 255, 255, .15) 25%, transparent 25%,
                                                transparent 50%, rgba(255, 255, 255, .15) 50%, rgba(255, 255, 255, .15) 75%,
                                                transparent 75%, transparent);
        background-image: -ms-linear-gradient(135deg, rgba(255, 255, 255, .15) 25%, transparent 25%,
                                                transparent 50%, rgba(255, 255, 255, .15) 50%, rgba(255, 255, 255, .15) 75%,
                                                transparent 75%, transparent);
        background-image: -o-linear-gradient(135deg, rgba(255, 255, 255, .15) 25%, transparent 25%,
                                                transparent 50%, rgba(255, 255, 255, .15) 50%, rgba(255, 255, 255, .15) 75%,
                                                transparent 75%, transparent);
        background-image: linear-gradient(135deg, rgba(255, 255, 255, .15) 25%, transparent 25%,
                                                transparent 50%, rgba(255, 255, 255, .15) 50%, rgba(255, 255, 255, .15) 75%,
                                                transparent 75%, transparent);

        -webkit-animation: animate-stripes 3s linear infinite;
        -moz-animation: animate-stripes 3s linear infinite;
}

@-webkit-keyframes animate-stripes {
        0% {background-position: 0 0;} 100% {background-position: 60px 0;}
}

@-moz-keyframes animate-stripes {
        0% {background-position: 0 0;} 100% {background-position: 60px 0;}
}
再次感叹一下,IE9不支持CSS3的animation特性,而且更糟,Opera也还没有支持,但webkit和火狐都很不错。
荧光
荧光效果用到了CSS3的::after伪元素。
.shine span {
        position: relative;
}

.shine span::after {
        content: '';
        opacity: 0;
        position: absolute;
        top: 0;
        right: 0;
        bottom: 0;
        left: 0;
        background: #fff;
        -moz-border-radius: 3px;
        -webkit-border-radius: 3px;
        border-radius: 3px;

        -webkit-animation: animate-shine 2s ease-out infinite;
        -moz-animation: animate-shine 2s ease-out infinite;
}

@-webkit-keyframes animate-shine {
        0% {opacity: 0; width: 0;}
        50% {opacity: .5;}
        100% {opacity: 0; width: 95%;}
}

@-moz-keyframes animate-shine {
        0% {opacity: 0; width: 0;}
        50% {opacity: .5;}
        100% {opacity: 0; width: 95%;}
}
光晕
光晕效果主要依靠box-shadow特性来完成。
.glow span {
        -moz-box-shadow: 0 5px 5px rgba(255, 255, 255, .7) inset, 0 -5px 5px rgba(255, 255, 255, .7) inset;
        -webkit-box-shadow: 0 5px 5px rgba(255, 255, 255, .7) inset, 0 -5px 5px rgba(255, 255, 255, .7) inset;
        box-shadow: 0 5px 5px rgba(255, 255, 255, .7) inset, 0 -5px 5px rgba(255, 255, 255, .7) inset;

        -webkit-animation: animate-glow 1s ease-out infinite;
        -moz-animation: animate-glow 1s ease-out infinite;
}

@-webkit-keyframes animate-glow {
 0% { -webkit-box-shadow: 0 5px 5px rgba(255, 255, 255, .7) inset, 0 -5px 5px rgba(255, 255, 255, .7) inset;}
 50% { -webkit-box-shadow: 0 5px 5px rgba(255, 255, 255, .3) inset, 0 -5px 5px rgba(255, 255, 255, .3) inset;}
 100% { -webkit-box-shadow: 0 5px 5px rgba(255, 255, 255, .7) inset, 0 -5px 5px rgba(255, 255, 255, .7) inset;}
 }

@-moz-keyframes animate-glow {
 0% { -moz-box-shadow: 0 5px 5px rgba(255, 255, 255, .7) inset, 0 -5px 5px rgba(255, 255, 255, .7) inset;}
 50% { -moz-box-shadow: 0 5px 5px rgba(255, 255, 255, .3) inset, 0 -5px 5px rgba(255, 255, 255, .3) inset;}
 100% { -moz-box-shadow: 0 5px 5px rgba(255, 255, 255, .7) inset, 0 -5px 5px rgba(255, 255, 255, .7) inset;}
 }
旧浏览器怎么办
正像我在文中不断指出的一样,CSS3和HTML5一样仍未完全普及(而且看起来也并非很快就能完全普及),在让新浏览器的显示效果变得很酷的同时,旧的浏览器仍旧需要考虑。
这是个头疼的问题,因为你的客户很有可能对浏览器的版本根本就不关心(甚至根本不知道浏览器是什么)。还好,多亏CSS3的平缓降级,旧浏览器虽然没有“哇”的效果,也不会出现乱子:
